sub_module_UI <- function(id) {

  # -- declare input
  textInput(inputId = NS(id, "text"),
            label = "Sub module server input",
            value = "")

}4 Communication between modules
This is I believe a topic that is not so well documented1, but not so different from previous chapters.
In my experience, every time you face a communication problem between your modules, the use case is out of the ‘getting started with’ examples, which ends up in hours of online searches (assuming you’re trying to understand the different options to make a wise choice – not asking a LLM to predict it).
The purpose of this chapter is mostly to go through the two patterns that may be used in a complex app and demonstrate that it is not different from what we saw previously.
Remember the main server-module server communication is basically parent-child communication.
Same applies to communication between modules.
4.1 Nested modules
As mentioned earlier, there are specific use cases when a module would call another module.
The typical use case for this implementation is when you want to delegate some task from the module to a sub module because your module server itself is growing and requires some architecture. Another great example is when a specific task / feature is not always needed. Maybe something not all users will be allowed to use or require. In this case it is good practice to avoid the creation of reactives and observers if they will never be reached2.
Maybe the term nested is not the best because it creates some confusion over the simple main server / module server pattern. It somehow feels like it is going to be different and many (including myself) starts their journey into the module world with a biased interpretation in mind.
Well, basically a nested module is in fact a child of a parent module, so that it is the same as having the main server as parent and a module as a child!
The only thing is that now, you need to think the communication as a two-step process.
Remember that everything is a child of something and runs into its own context.
Important
One key best practice here is that data / information should3 go through all levels of the architecture from the source level to the target level otherwise you will break the mindset of the architecture.
Another good reason why to pass on information along the hierarchy is that it is then possible to alter this information before passing it to the next level.
Imagine a data.frame that is passed to a module from the main server, maybe a sub/nested module only requires a specific columns to compute a value or a plot.
4.1.1 Inputs
Again, everything here will work exactly like we saw in the previous chapters.
The goal here is to observe and understand the mechanism so that it will help demystify it when it comes to creating your own architecture.
Tip
The module-nested-input folder of the GitHub repository linked to this book implements a basic use case of a server / module / nested module implementation to support this section.
In this example, the main app server calls a module server function in which the sub / nested module server is itself called.
The sub module has a sub_module_ui function which defines a text input:
The key notion to understand here is that as long as you pass the ‘correct’ id value to the function, it could be used at any level (typically the main server) to implement the input. But as long as you made a choice to implement a sub module level, you should stick to only create parent-child dependencies.
This means the sub module UI function should always be called from its parent – no matter if the parent is the main server or another module (this is what encapsulation actually means).
module_UI <- function(id) {

  # -- return
  tagList(

    # -- module input
    numericInput(inputId = NS(id, "numeric"),
                 label = "Module server input",
                 value = 0),

    # -- sub module UI
    sub_module_UI(NS(id, "submodule")))

}
To ensure this encapsulation principle, the sub_module_UI function is called from the module_UI function. In most cases, you will add more content together with the UI coming from the sub module – here we add a numeric input – but you may also just create a wrapper function around the sub module UI function.
Tip
Have you ever played around with the NS() function?
Notice how we keep using NS(id, "some_inputId") at each module level.
Calling module_UI(id = "module") will then call sub_module_UI(NS(id, "submodule")) that in turn calls textInput(inputId = NS(id, "text"), ...)
Well this is just like calling NS(NS("module", "submodule"), "text") which ends up in
“module-submodule-text”
In fact, NS even accepts vectors like NS(c("foo", "bar"), "zoo") but I don’t see any use case except if you break the encapsulation (which in turn is not a valid use case).
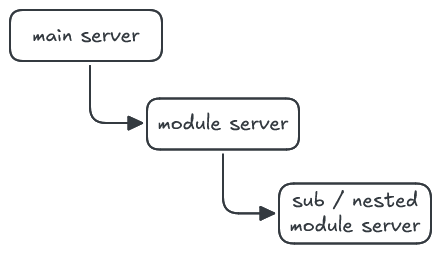
The resulting UI architecture looks like this:

You may ask yourself why I put the modules UI functions inside dotted boxes.
Well, they are not really executed like that nor at different levels since they are only called from the main app UI as a chain4! Only the namespace assignment makes their input visible to a certain module / level in the architecture. This ensures that a given module can be used at any level of the hierarchy (we could imagine of a module being used in different branch at different levels for example).
All of the three servers have a listener that prints the names of the input list:
Listening on http://127.0.0.1:7393
Input(s) seen by the sub-module server: text
Sub-module input =
Input(s) seen by the module server: numeric / submodule-text
Module input = 0
Input(s) seen by the main server: module-numeric / module-submodule-text
See how everything is really a matter of context / scope and parent-child relationship!
Basically, if you say zoom on the module and sub module levels, you get exactly the same result as the one we saw in the module communication chapters.
When building an architecture for your apps, it is key to keep in mind how the information flow goes through the different layers (and between the UI / server sides):
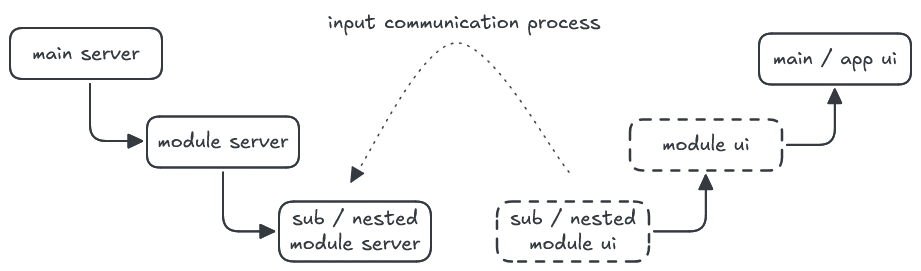
While the UI representation of an input goes up through the UI functions, its value on server side goes down from a level to the next one and is directly5 accessible at the right level thanks to the namespace mechanism.
4.1.2 Outputs
Here we will just implement same basic example as for the module communication to see how things go.
Remember that outputs are meant to communicate / render information from the server side to the UI side up to the main app level (what the users see).
Tip
The module-nested-output folder of the GitHub repository linked to this book implements a basic use case of a server / module / nested module implementation to support this section.
Basically, it has the same architecture as the previous section’s example except all three servers (main, module & sub-module) focus on the outputs.
They implement a simple text output6 :
output$text <- renderText("This is a sample text from the main server")And use the same approach as for the module communication to explore the visible outputs:
outs <- outputOptions(output)
cat("Outputs seen from the main server: ", paste(names(outs), collapse = " / ", "\n"))
The output from the sub-module server is rendered inside the sub_module_UI function while the one from the module server is rendered in the module_UI function along with a call to the sub-module UI function7.
When launching the app, the console will display this:
Listening on http://127.0.0.1:7393
Outputs seen from the submodule server: module-submodule-text
Outputs seen from the module server: module-submodule-text / module-text
Outputs seen from the main server: module-submodule-text / module-text / text
Note
Notice how the module and sub-module servers only see the outputs from their own scope but still see them with their names wrapped into the namespace8.
Let’s recap all this in a communication schema:
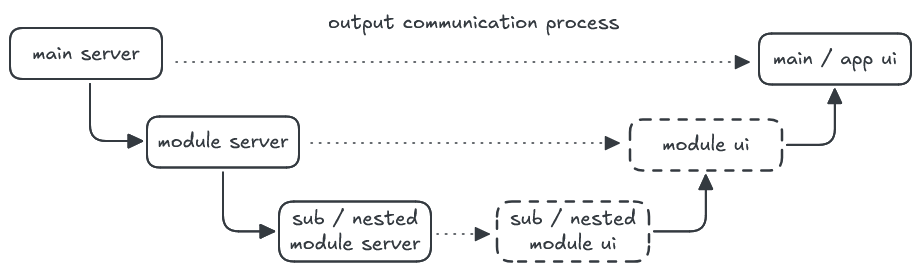
Outputs are defined on the server side, then consumed on the UI side at the same level, then go up through the UI functions just as the inputs did9.
There is no backward communication since outputs are just meant to display content into the browser.
4.1.3 Parameters
As we saw earlier, parameters are used in a quite standard way when it comes to module server functions and having nested modules is no exception to that.
Tip
The module-nested-parameter folder of the GitHub repository linked to this book implements the use case of a server / module / nested module implementation to support this section.
The idea here is to observe how an input value can be passed on from the main server (main app level) to the sub-module. In order to make thinks a bit more realistic10, the input value will be altered as the module server level.
This time the main app is just composed of a numericInput on UI side, and the server is listening to its value:
function(input, output, session) {

  # -- declare reactive (to pass on to the module)
  foo <- reactive({
    cat("Server input update / value =", input$numeric, "\n")
    input$numeric})

  # -- launch module server
  module_server(id = "module", trigger = foo)

}
We could just set trigger = reactive(input$numeric) but the intermediate foo reactive helps showing that we actually pass the reference of the reactive (not its value) to the function parameter.
The module server listens to this reactive just like it did in the module communication chapter except this time we will wrap the dependency into a reactive11 as well:
module_server <- function(id, trigger) {
  moduleServer(id, function(input, output, session) {

    # -- check parameter
    stopifnot(is.reactive(trigger))

    # -- listen to the trigger & create a reactive
    bar <- reactive({
      cat("Module parameter update / value =", trigger(), "\n")
      trigger() * 2})

    # -- call nested module
    sub_module_server(id = "submodule", trigger = bar)

  })
}
The sub-module server only observes its reactive parameter (reinforcing the idea that it could be used in any kind of component as long as you take a dependency on its value):
observeEvent(trigger(),
             cat("Sub-module parameter update / value =", trigger(), "\n"))
At launching, the console will display the initial trace (the input is valuated with 0 at start-up). Here the user has clicked once on the numericInput increment arrow:
Listening on http://127.0.0.1:3270
Server input update / value = 0
Module parameter update / value = 0
Sub-module parameter update / value = 0
Server input update / value = 1
Module parameter update / value = 1
Sub-module parameter update / value = 2
As expected, the value is passed from the main server to the module server.
It is then altered and passed on to the sub-module server.
Note
Note that we chose to pass on the input value defined at the main level, but we could pass any kind of data.
The resulting communication schema is as follows:
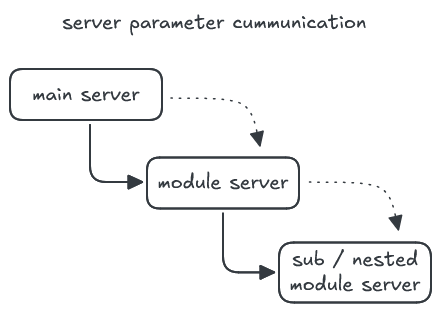
The important takeaway here is that the key to launch specific tasks inside a module is to pass a reactive reference as a parameter and take dependency on it inside the module.
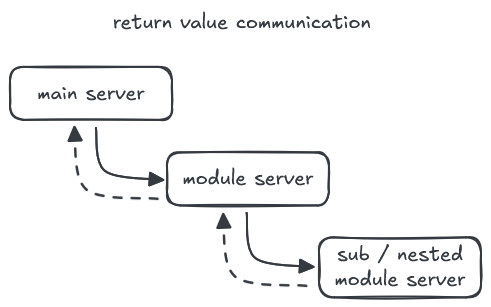
4.1.4 Return value(s)
Just as we can pass parameters from server function to server function, it is possible to pass their return value(s) from one level to another.
Remember that module server functions are like any other function in the sense that they return a value to the caller and all you need to do is assign this return value at the upper level.
Tip
The module-nested-return-value folder of the GitHub repository linked to this book implements the use case of a server / module / nested module implementation to support this section.
The use case here is very simple. The goal is just to pass on some return value from the sub-module up to the main server. There’s no UI involved except at the main level to display the value and demonstrate the reactive process.
Let’s start with the sub-module server to follow the flow of information:
# -- return value
reactive({

  # -- Re-execute this reactive expression after 1 second
  invalidateLater(1000)

  # -- random value
  rnorm(n = 1)

})
It contains a single reactive instruction (so this will become the return value).
I’ve used the invalidateLater function to avoid creating an input that would bring some ‘noise’ into the code. It will somehow force the reactive to update itself after a delay.
The module server function captures this return value by assigning the result of the call to the sub-module function to an object:
# -- call nested module
bar <- sub_module_server(id = "submodule")

# -- return value
bar
There’s a bit of a nonsense here because as long as you don’t do anything with bar and just returns it in the next line, it should just be sub_module_server(id = "submodule") and the module server function would return… the return value from the sub-module.
I’m just writing these two lines to make things explicit, assuming that in most cases, there will be other instructions in the module functions, and most probably some computation in between the call to the sub-module server function and the return instruction of the module server function.
The main server function calls in turn the module server function and reuses its reactive return value to build an output for the UI to display:
# -- launch module server
foo <- module_server(id = "module")

# -- define output
output$box <- renderUI(value_box(title = "From main server",
                                 value = foo()))
When you launch that app, you will get a box on the UI which content value will be updated on every second, showing that the value defined at the sub-module server level is passed up to the main server level through the reactive return values.
The communication schema is quite simple here:
4.1.5 Conclusion
As you can see, everything works the same as with a single module as long as you consider only parent-child relationships. That is something critical to include from the very beginning of your architecture thinking as you don’t want to pass unnecessary data from a module to another one just to feed the next level. In this case it is better to have the second module at the same level as the first one and this is what we are going to explore next.
4.2 Sibling modules
When your modules are handling separate tasks or features that do not directly involve the other modules, it is better to keep them at the same level to reduce the information workflow and keep the architecture easier to understand.
We sometimes talk about sibling modules in the sense that they belong to the same level of hierarchy in the application architecture, but this introduces a misunderstanding that siblings usually know each other while this is not true for modules!
In fact, sibling modules don’t even exist.
Everything is a matter of parent-child relationship assuming that in case there are other children, they don’t know each other. One box (scope) in the hierarchy just knows about its direct parent (who called its server function) and about its direct children (what server functions it calls).
Everything else is a blackbox that it should know nothing about.
So, if we come back to the notion of sibling modules, it is in fact just two autonomous parent-child relationships and the parent has to deal with all the communication.
We’ve seen how to communicate from the main server to a module server and back but how to communicate from module server 1 to module server 2?
4.2.1 Inputs
We’ve seen how inputs are dedicated to UI / server communication and why they should stick to it.
This section will describe what we can observe within each scope to set the context and make sure you get a strong understanding of the workflow.
Tip
The module-siblings-input folder of the GitHub repository linked to this book implements the use case of a server having two modules to support this section.
So basically, the main server function calls two module server functions and both modules have a UI function implementing a specific input.
When you start the app, the entries of the input list are displayed to the console for each server:
Listening on http://127.0.0.1:7881
Input(s) seen by the module_1 server: numeric
Input(s) seen by the module_2 server: text
Input(s) seen by the main server: module1-numeric / module2-text
Basically, everything here works just like for when we had only one module (see Chapter 1 for detailed description).
Each module just knows about its own scope, so there is no way to directly communicate an input from a module to another one, which is great since as we saw, an input is meant to communicate from the UI to the specific module server. So, if you need to pass an input to module 1 or module 2, then this input should be in priority defined in the corresponding module.
That being said, in specific cases, you could need to pass an input value from one module to another.
But then it is just like a return value + function parameter ‘combo’ that we will see in a later section (see @sec-siblings-parameters-return-values).
4.2.2 Outputs
Just like sibling modules inputs are just standard module inputs, sibling modules outputs don’t really know each other and should stick to their own scope.
Tip
The module-siblings-output folder of the GitHub repository linked to this book implements the use case of a server having two modules to support this section.
In this example, same architecture is kept and both module servers declare a single output and print the names of the outputs.
The following is printed to the console when you launch the app:
Listening on http://127.0.0.1:7881
Outputs seen from the module1 server: module1-text_1
Outputs seen from the module2 server: module1-text_1 / module2-text_2
Outputs seen from the main server: module1-text_1 / module2-text_2
While this may look confusing since it looks like module2 can see both modules’ outputs but module1 only sees it is own output, a quick look at the main server provides the answer:
# -- launch module servers
module_1_server(id = "module1")
module_2_server(id = "module2")
Since the print instruction is run only once at the module start-up and module1 is launched first, it explains that – at the moment when the expression is evaluated in module1 – a single output is declared.
What I’m trying to demonstrate here is that – from say a technical point of view – both outputs could just be used inside the other module’s UI function12. But that would immediately create confusions as well as cross dependencies that are very difficult to manage.
Once again, in case some module output requires data or information from another module, it should go through a return value + function parameter workflow and only then be part of an output expression.
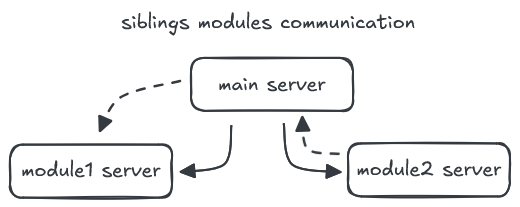
4.2.3 Parameters & return values
Both function parameters and return value just work the same with multiple sibling modules as for a single module.
So, as we saw in previous sections of this chapter that a mix of return value plus function parameter is the key to communicate information from a sibling module to another, we will focus here on this implementation.
Tip
The module-siblings-communication folder of the GitHub repository linked to this book implements the use case of a server having two modules to support this section.
Module1 server function contains a single reactive expression that again will update itself on every second thanks to the invalidateLater function:
# -- return value
reactive({

  # -- force update the reactive every 1 second
  invalidateLater(1000)

  # -- random value
  rnorm(n = 1)

})
This automatically becomes the return value of the module1’s server function which is assigned to an object at the main server level:
# -- launch module server and assign return value
foo <- module_1_server(id = "module")

# -- launch module server and pass parameter
module_2_server(id = "module", trigger = foo)
This (reactive) object is in turn passed to the second module as a parameter of the server function which takes a dependency on it to print the value to the console:
Listening on http://127.0.0.1:7881
Module2 parameter update, value = 0.6908065
Module2 parameter update, value = -0.8008129
Module2 parameter update, value = -1.612656
It is important here to understand that module1 actually communicates to module2 since the reference of the reactive is passed from module1 to the main server then to module2. So, when the reactive is updated in module1, it directly triggers action inside module2.
Of course, you could also imagine that the main server has some work to do with the return value before pushing it to the second module and the information workflow would become a cascading process.
Note
Also note that both modules could communicate information to each other as long as you don’t create a reactive loop!
This is a very powerful and efficient communication workflow and will be the basis for the wrap up use case that is mentionned in the communication manifest chapter (see Chapter 10).
There is a good introduction article in the Shiny documentation (Nantz), but it relies on the
callModulefunction while its help page suggests to usemoduleServer.↩︎Input entries are created only when their UI is implemented.↩︎
‘Should’ because technically the main server could listen to a nested module’s input with the correct namespace.↩︎
So it is more main app UI > module UI > sub module UI↩︎
By directly, I mean through an
input$fooinstruction↩︎Note that in real life, this
renderTextwould involve some dynamic content (or be on UI side)↩︎Same approach as for the inputs↩︎
That’s because you can’t read outputs unless you pass them to *output functions (here
textOutput)↩︎Because they are basically HTML at this stage↩︎
Use-cases are voluntarily very simple to avoid mixing notions as they are meant to support a specific section of the book.↩︎
Indeed, we need a reactive component that returns a value!↩︎
Or even inside the other module server function↩︎