.my-bg-gradient {

  color: #2d3037;

  background: #c09f7f;
  background: linear-gradient(to bottom right, #c09f7f, #ba9677, #86614B);

}How to customize {bslib} backgrounds with CSS
R
shiny
bslib
css
When it comes to R Shiny web applications, bslib is a great library to manage most of the UI / HTML layout without diving into css. But in some cases - here we want to set a custom gradient background on a card - it’s necessary to add a bit of css code on top of it.
This tutorial demonstrates how to achieve this in a simple way.
Materials
A GitHub repository is available for you to explore in detail several examples around this tutorial as well as a video on YouTube.
GitHub repository: template-r-shiny-bslib-backgrounds
YouTube video: xxx
Introduction
By default, Shiny comes with many CSS classes that are applied on the HTLM components.
And so do bslib.
You can see that by using the inspect command for example on a card object:

Basically a card is a div with class = "card"
So what you want to do is add a custom class on this object, and it can be done with the following steps:
create a css file with the code for the custom class
include this css code into the Shiny app UI
apply the custom class on the selected object(s)
Create the custom CSS class
Shiny allows users to apply custom CSS files on their application UI, but there is a little trick you need to know.
In order for the CSS code (or anything) to be available from the browser session, it has to be created in a www directory
that Shiny will automatically detect and make available.
Create a new folder at the app level (here it’s a single file app because there will be no server code)
Now you can use the File + New File + CSS File menu to get a blank CSS file where to create your class.
To make it simple, my file only contains one class.
Note that this block also contains a color to be applied on the font inside the card.
That is because the font color in bslib is ruled by bootstrap so it won’t automatically adapt when you apply a custom css.
Tip
If you are not familiar with CSS code, there are many online tools to generate code from interactive inputs.
You will usually be able to pick among existing gradients in a library or create your own custom gradient by selecting stops & colors.
Here is the one I used for this example:
https://cssgradient.io/
Save this file as theme.css for example
Include CSS into Shiny
As I said, Shiny will make the CSS file available from the browser.
But it won’t apply it automatically on the UI.
For this, you need to include the CSS file into your UI code:
# -- Define UI for the application
ui <- page_navbar(

  # -- include css
  header = tags$head(
    tags$link(rel = "stylesheet", type = "text/css", href = "./theme.css")))
Note:
there are different ways to include css in a Shiny app, see the link in the reference section to get more information on this
there is no need to include
wwwin the path to the CSS file (but you could have sub-folder(s) if you want)
Apply the CSS class
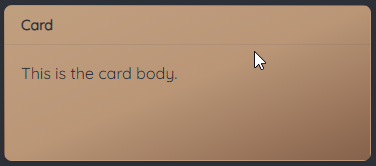
All you need to do now is add the class to the card object using the class argument (see ?card):
card(
  class = "my-bg-gradient",
  card_header("Card"),
  p("This is the card body."))
Note that the class could be applied at different levels since a card is made of a header and a body.
Apply at card header level:
card(
  card_header(class = "my-bg-gradient", "Card"),
  p("This is the card body."))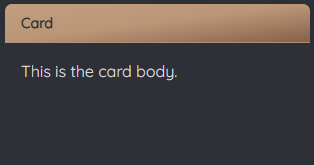
Apply at card body level:
card(
  card_header("Card"),
  card_body(class = "my-bg-gradient",
            p("This is the card body.")))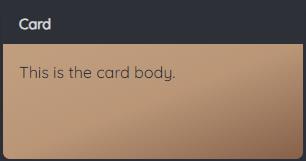
Conclusion
As we saw in this tutorial, it’s very easy to use custom CSS in your R Shiny app and a great way to go beyond the bootstrap capabilities that are made available to us through bslib.
As any CSS class, it can be applied anywhere as long as the HTML component behind accepts to receive a background property. Use them on cards and value boxes to personalize the look & feel of you apps!
Remember, there is a GitHub repository for you to play around with the code as well as a video on YouTube:
GitHub repository: template-r-shiny-bslib-backgrounds
YouTube video: xxx
References & materials
The bslib reference documentation
Shiny documentation: Using custom CSS in your app
Generate css gradient code: cssgradient
Pick your colors! HTML color codes
To understand css gradients: w3schools